The holiday season is the perfect excuse to dress up everything — including your nails. Whether you’re heading to a Christmas party, a cozy winter brunch, or simply want to show off your festive spirit, holiday nail art is an easy and stylish way to elevate your look. The best part? You don’t need to be a professional or spend hours at the salon. These 11 quick and easy holiday nail art ideas are perfect for all skill levels. With just a few tools, some polish, and a little creativity, you can bring a touch of seasonal cheer to your fingertips.
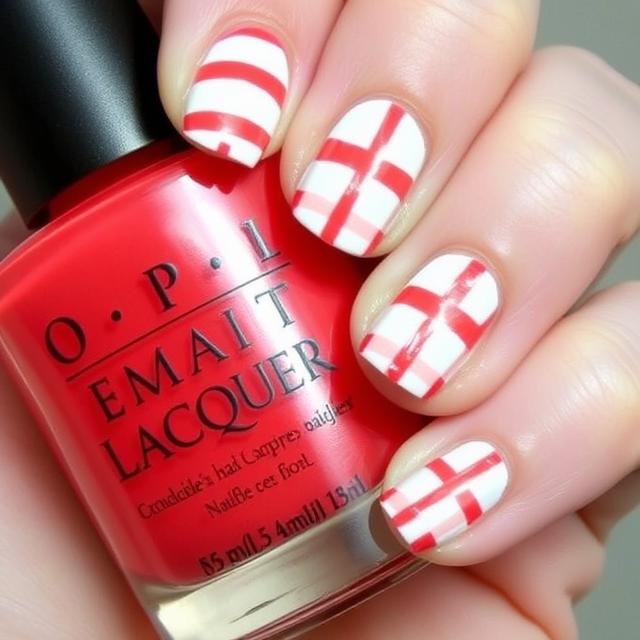
1. Classic Candy Cane Stripes
One of the most iconic symbols of the holiday season is the candy cane, and it translates beautifully into a festive nail art design. Start with a solid white base coat and let it dry completely. Then, using red striping tape or a thin brush, paint diagonal stripes across each nail to mimic the traditional candy cane pattern. If you’re feeling adventurous, try alternating between matte and glossy red stripes for added texture. You can also use glitter red polish to add a touch of sparkle. Seal the design with a high-gloss top coat to keep it chip-free through all your holiday festivities. It’s bold, bright, and instantly festive — perfect for anyone who wants to keep it classic yet striking. Plus, this look pairs perfectly with any red or white outfit, making it incredibly versatile for the season. The simplicity of this design means even beginners can master it quickly. Pro tip: Use nail vinyls or tape to keep your stripes clean and even.
2. Snowy Glitter Fade
Bring a winter wonderland to your nails with a snowy glitter fade. This design mimics the look of fresh snowfall gently dusting your fingertips. Start with a pale base — soft blue, icy white, or even a cool lavender. Once that dries, take a chunky silver or white glitter polish and focus the application at the tips of your nails, gradually fading the glitter down toward the base. Use a makeup sponge to dab the glitter for better control and a smoother gradient. This method creates a sparkly ombre effect that looks both delicate and festive. It’s a foolproof look that doesn’t require steady hands or detailed brushwork, yet the result is undeniably elegant. The glitter catches the light beautifully, making it ideal for both daytime holiday events and nighttime parties. You can even customize it further with snowflake decals or a subtle shimmer top coat. It’s low effort, high impact, and absolutely magical. Keep your nails short and rounded for a chic finish, or go long and almond-shaped for that icy queen aesthetic.
3. Minimalist Christmas Tree Accent
For those who prefer understated elegance, the minimalist Christmas tree accent nail is a perfect option. Paint all your nails a nude or soft beige shade as the base. Once dry, choose one accent nail — usually the ring finger — to feature a simple, stylized Christmas tree. Using a thin brush or a nail art pen, draw a triangle-shaped outline or a few stacked lines in green to form the tree. Add a tiny gold or red dot at the top for a star, and a few white or metallic dots for ornaments. Keep it sleek and restrained to maintain the minimalist vibe. This design works beautifully with gold jewelry and cozy, neutral holiday outfits. It’s also office-friendly, meaning you can wear it throughout December without feeling too over-the-top. The simplicity of this look makes it quick to execute and easy to customize depending on your color palette. For extra flair, consider using metallic green or adding a small swipe of glitter to the tree. This nail art says festive without shouting, making it a favorite for the modern minimalist.
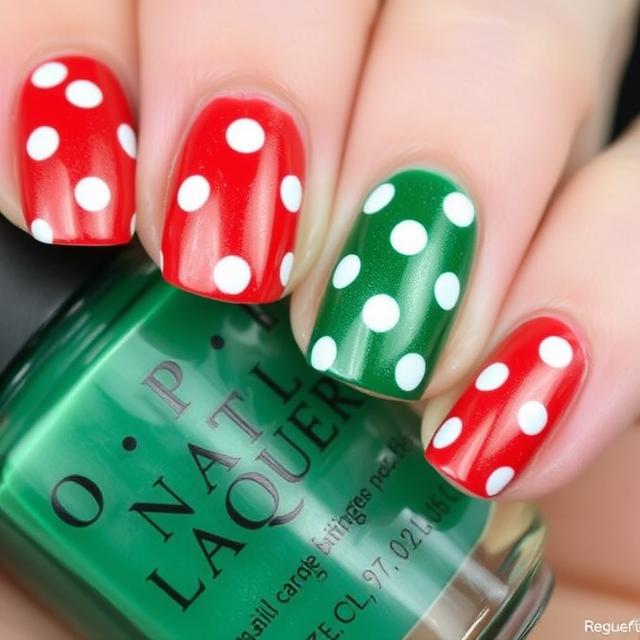
4. Festive Polka Dots
Polka dots never go out of style, and during the holiday season, they’re a quick and playful way to dress up your nails. Start with a classic holiday base like red, green, or even metallic gold. Once it dries, use a dotting tool (or the tip of a bobby pin) to apply contrasting dots in white, gold, or silver. Keep the dots evenly spaced for a tidy look or go for a random scatter for something more whimsical. You can also mix it up by alternating dot sizes for added dimension. This design is perfect for all nail lengths and shapes, making it universally flattering and easy to DIY. If you’re short on time but want something that looks like you tried, this is your go-to style. Try creating a reverse polka dot where the base is white and the dots are festive colors for a snowy look. The best part? No artistic skills required — just dot, dry, and topcoat! This is a great option for kids too, making it a fun family holiday activity.
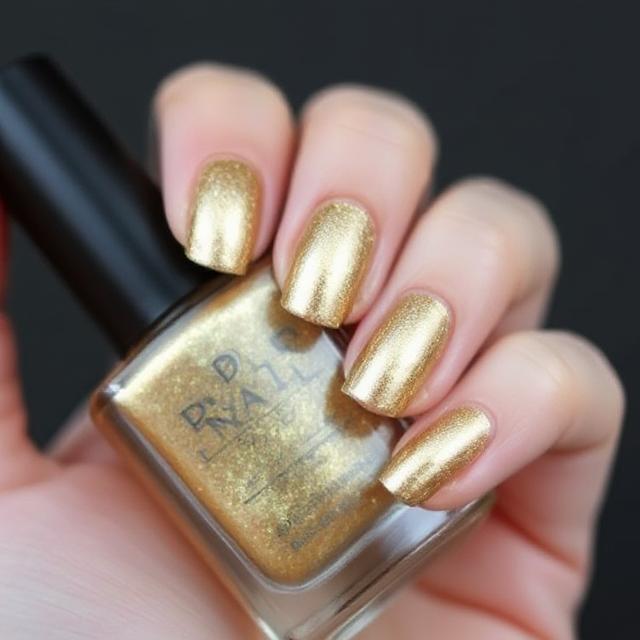
5. Gold Foil Glam
Bring on the luxe vibes with a gold foil nail art look that screams holiday glam. Begin with a deep, rich base color — think burgundy, navy, or forest green. Once dry, use gold foil pieces (available at most beauty supply stores) and gently press them onto the nails using a clear polish or nail foil adhesive. The result is a gilded, abstract pattern that looks both sophisticated and festive. No two nails will look the same, which adds to the charm. Gold foil nails work well with both glossy and matte top coats, depending on your style. The shine and texture make it a standout look that’s perfect for formal holiday parties or a New Year’s Eve bash. It’s also surprisingly easy to do — just tear the foil into small pieces and apply with tweezers. You can go full coverage on some nails and keep it minimal on others for an artful mix. Pair this with gold jewelry and a bold lip, and you’re ready to slay every holiday event.
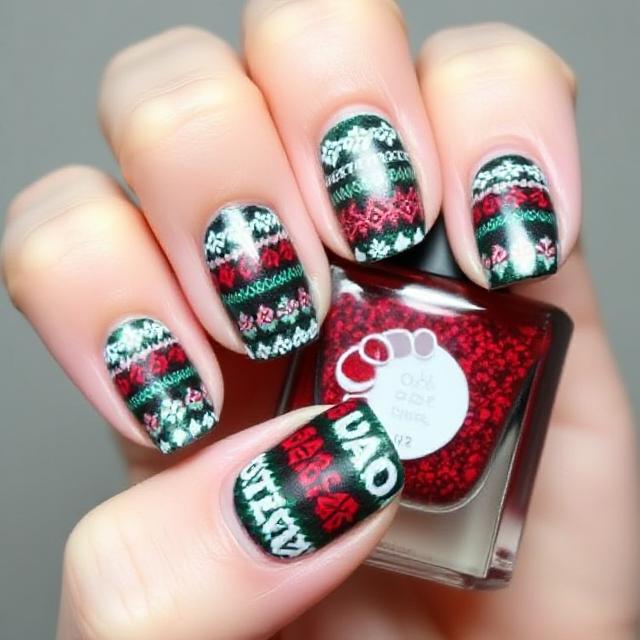
6. Ugly Sweater Pattern
Why should your nails miss out on the ugly Christmas sweater fun? This quirky, nostalgic design brings holiday cheer to your fingertips in the most playful way. Start with a base coat in a solid, bold color like red, green, or royal blue. Then, using white polish and a nail art brush or stamping plate, create small sweater-like patterns — zigzags, snowflakes, hearts, and dots all work perfectly. The key is to mimic the repetitive nature of real sweater patterns. It doesn’t need to be perfect; a slightly imperfect, hand-drawn look adds to the charm. This design is sure to get compliments and laughs, especially if you’re wearing a matching sweater. While it can be a bit more time-consuming, focusing on just one or two nails with the full pattern and keeping the others simple is a great way to speed things up. If you’re into DIY crafts, this nail art is your jam. Go ahead and get as loud and kitschy as you like — after all, that’s the whole point!
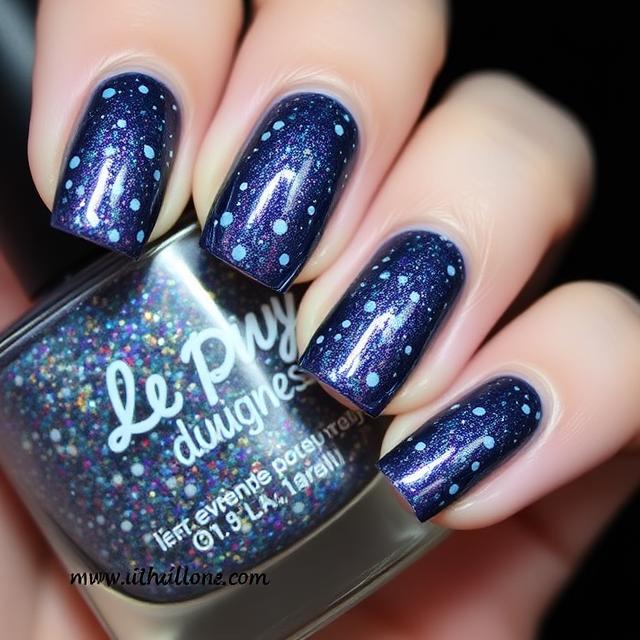
7. Starry Night Sky
Embrace the magic of winter nights with a starry sky nail design that’s both dreamy and festive. Start with a dark base — navy blue or black works best — and add a layer of fine shimmer polish to mimic the sparkle of stars. Then, using a dotting tool or a toothpick dipped in white polish, create tiny stars across your nails. Add a few slightly larger stars or constellations on accent nails for a more intricate touch. You can even incorporate tiny moon decals or glitter for extra whimsy. This look is mesmerizing, like gazing up at the night sky on a crisp December evening. It pairs beautifully with velvet outfits and deep-toned holiday dresses. Best of all, the design is forgiving — any little slip can easily become a twinkle in the sky. If you want to level up the celestial theme, try using glow-in-the-dark polish or top with a holographic top coat. This nail art idea is as magical as the season itself and works well beyond Christmas, making it perfect for ringing in the New Year too.
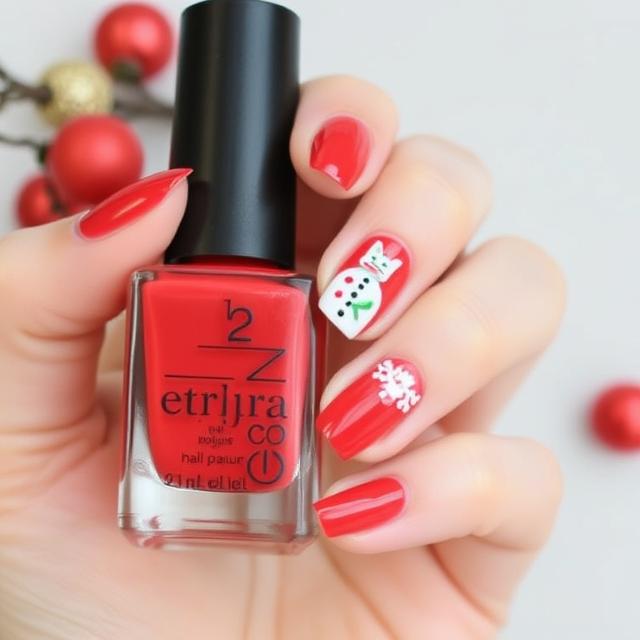
8. Mistletoe Magic
Add a romantic twist to your holiday nails with a mistletoe-inspired design. Start with a soft white or blush pink base coat. On your accent nail (or all of them if you’re feeling extra festive), paint a small sprig of mistletoe using green polish and a thin detail brush. Add a few red dots for the berries, and top the sprig with a delicate gold or silver ribbon. This design is sweet, subtle, and full of seasonal charm. It’s ideal for those who love romantic, storybook-style holiday aesthetics. The best part? It looks especially cute when you’re holding a mug of cocoa or showing off your favorite holiday ring. For an easier version, use mistletoe nail stickers or decals and embellish with dots of red polish for the berries. This look pairs beautifully with cozy knits, pastel holiday looks, or soft glam makeup. It’s festive without being flashy and tells a cute story with just a glance. Great for couples’ events or cozy winter date nights!
9. Peppermint Swirl
Give your nails a sweet twist with a peppermint swirl design that looks good enough to eat. Start with a white base on all nails. Using a fine brush or nail art pen, paint red curved lines starting from the center of the nail outward in a pinwheel pattern. The result is a striking candy swirl effect that instantly feels festive. It’s bold, bright, and completely eye-catching — perfect for holiday parties or themed photo shoots. To take it up a notch, you can alternate nails with full swirls and nails with red and white stripes. Add a touch of sparkle with a glitter top coat or even embed a few rhinestones for extra glam. If the design feels too intense for every finger, go for one or two swirl nails and paint the rest red or white for balance. This style screams holiday fun and nostalgia and is guaranteed to be a conversation starter. Just make sure to let each layer dry before adding the next for the cleanest result.
10. Frosted Tips
Inspired by frosted windows and snowy mornings, frosted tips are a subtle and elegant way to bring winter vibes to your manicure. Start with a sheer or nude base coat. Once dry, dab white polish or shimmery silver at the tips of your nails using a sponge or small brush, creating a faded “frost” effect. This is like a wintery take on the French manicure — but softer, cooler, and more festive. You can add a layer of iridescent shimmer or pearl topcoat to enhance the icy effect. For more drama, try a matte base and glossy frosted tips or vice versa. This nail art is understated enough for the office but sparkly enough for special events. It complements all skin tones and nail shapes and gives your hands a clean, elegant appearance. Whether you’re wearing cozy winter knits or a sleek holiday gown, these nails fit right in. It’s a timeless look with a modern seasonal twist.\

11. Santa Hat Accent
Cap off your holiday nail art with a cute Santa hat accent design. Paint all your nails red or nude, and choose one nail to feature the hat. Start by painting a small red triangle near the cuticle, then outline it with white polish to create the fluffy brim. Add a small white dot at the tip for the pom-pom. It’s simple, quick, and adorable — like having a tiny Santa right at your fingertips. You can do this on all nails for a bolder statement or just stick with one or two for a playful pop. This style is great for younger nail artists too, as it doesn’t require complex shapes or tools. Pair this look with red lipstick and a cute Christmas sweater for ultimate holiday vibes. For an extra kick, outline the hat in silver glitter or add a small holly decal. This design will have you feeling merry and bright every time you look down at your hands.
Holiday nail art is one of those little joys that can make the season feel even more magical. Whether you prefer understated elegance or bold, whimsical designs, there’s a holiday manicure out there for everyone. The best part is how accessible it all is — with a few colors, some creativity, and maybe a little glitter, you can transform your nails into miniature holiday masterpieces. Try one, or mix and match a few for a festive flair that matches your mood and wardrobe. Happy painting, and may your nails be merry and